Sunday, December 17, 2023

Carrot Top Dyeing

 I have figured out that my favorite natural dyeing is with materials from my yard/garden or the grocery store.  Last week, I came upon a youtube channel that changed my approach, both to how and what I dye. 

I had not tried carrot tops before. The vid that I was watching promised oranges. I got lovely greens. I followed directions, although I am the first to admit that I am BAD at weighing dyestuff and fiber, perhaps that's why I got greens...I will work to improve!

Here are some photos from my process, but I will leave it to you to view the youtube link below for specific directions!


Below is a large glass "pickle" jar in a "bain marie."  A paint strainer is used to hold the dyestuff. I love this method as the glass jar allows me to see what is going on inside. Watching color seep into the water is a large part of the fun for me. I will be trying this method with other dyestuffs. The glass jar also allows one to watch the color seep into the yarn or fiber once it is added.


The dye stuff  (in this case carrot tops)  simmers for an hour. Then, alum mordanted yarn is added to the glass dyepot, and simmered for an hour, then left to cool overnight. I was expecting orange but got a lovely green. (I love both colors so I did not care...)


here is the video link: thanks to https://wildcraftdyeing.com/https://www.youtube.com/watch?v=Rs7FELt0NM4&t=240s


Update, 6/24:  I was lucky to find a bunch of carrots at the farmer's market and decided to try again this month, in part to be sure that they did not go orange, here is the result: 


No indeed, still green which is good, I love greens. The top 2 are mohair, the bottom one I think is polypay. All my handspun.

I have been trying to cultivate Queen Anne's Lace in a pot to no avail. I had a carrot come up by chance and so I did not pick it and it flowered. This may be the only version of the daucus family that I get to enjoy here in Savannah, not too unhappy, though...


Monday, November 20, 2023

Thoughts on Tapestry Weaving

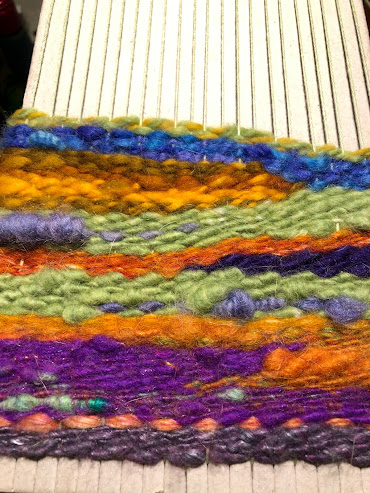
 I sometimes concern myself with which aspects of a particular fiber project are indeed "art" (vs, "craft" or technique). So um yes in pondering this here is a checklist for a current project.  Some "art" some "craft"...you decide. Perhaps all of these constitute part of this debate...


These are all "checks in the positive"...


*my handspun yarn included

*a friend's handspun yarn included

*loopy mohair included (just joking...)

*yarn acquired at fiberguildofthesavannahs included

*Handdyed included

*loom acquired for free (thanks SWHFiberworks)

*barberpole and non barberpole yarn included

*wool AND synthetic yarn (eeks but the color and sheen is great) included

*spontaneous decisions about design


what have I forgotten?? It's not done but I love it


Tuesday, October 17, 2023

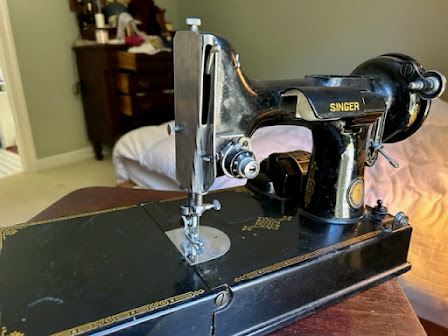
Singer Featherweight Concerns

 Last year, I bought  new Featherweight 221 here in Savannah. My sister spotted it and I credit her with being the enabler. I did not try it out before purchasing...a dangerous move.  I paid $295.

When I got home, I plugged it in and she hummed nicely and the needlebar moved, so I was happy. (They are all female, right?) I did not try sewing on it however.


The serial number indicated that is is a 1950 model made in Elizabeth, NJ.


Here is my source for serial numbers: https://ismacs.net/singer_sewing_machine_company/serial-numbers/singer-sewing-machine-serial-number-database.html


And here is my source for locations: http://www.oldsewingear.com/blog/where-was-my-singer-machine-made

Today I decided to take it for a spin. I oiled it up from directions from these nice folks: https://www.youtube.com/watch?v=-OyRXkSLcY8

After that I noticed that the bobbin case had a problem that could not be fixed, someone had snapped a minute metal part. But this guy was instrumental in helping me figure that out: 

 https://www.youtube.com/watch?v=CLqIAIEiF0w&t=324s

Apparently it's good to check the bobbin case before buying and to threaten anyone doing service on your machine to not swipe it and replace with a cheap import...but I may try just that myself... (wish me luck). 

 But in the meantime, I have another Featherweight from 1940, also made in Elizabeth NJ,  that runs like a top, so I got that one out:


Monday, August 21, 2023

A Local Shawl

Here's a shawl of which I'm quite proud. The yarn came from a Cormo sheep at Pat Cook's farm, Four Arches. She has a lovely  B and B and I would recommend it if you want a stay in beautiful rural Pembroke Georgia! Pat's flock of sheep and others is kind of a rescue operation, making it even more special!

The yarn was dyed with two different dyes and one pigment. The dyes were madder for the pink color, and osage orange for the mustard shade. Indigo is not a dye, it is a pigment because is in insoluble in water and forms a physical and not a chemical bond with what is dyed.

The pattern I used is Muirburn by Anne Hansen, a variation on a Scottish hap shawl.  I have been a fan of Anne's lace patterns for a long time. 


Tuesday, August 1, 2023

Stitching with Natalie on Two Skirts

I relearned that I like to stitch.

Several years ago (2018 or 2019)  I was visiting a friend and another acquaintance in Savannah. The friend had a Craftsy membership and started showing us some sample courses. We spent a few minutes on the preview to Natalie Chanin's swing skirt class, which uses cotton jersey, all hand stitching, and reverse applique.  I went home VERY inspired. 

I felt like my creative life had taken a major turn; it was an epiphany. I went home, signed up for Natalie's skirt course. I did one from a kit before undertaking these projects here. I had never used cotton jersey in sewing. What a revelation! You can cut it and embrace the imperfection and beauty of wonky/natural/in the moment stitching!

My first from-scratch skirt in the style of Alabama Chanin. was made with: upcycled tee shirts, a stencil borrowed from Her Majesty Margo, day-glo fabric spray paint (who knew that that existed?) and cotton and metal thread. The pattern is in 4 panels (front and back, left and right), with a turn down waist to form a casing in which to  insert an elastic band.  They are both reversible so you can wear them with stitching side showing!

Margo's stencil being removed from the panel


Panel ready for stitching


Finished skirt!


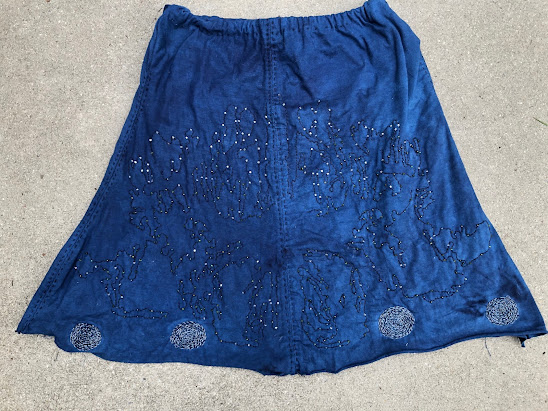
The following one is a bit more original. At my Guild dye day I decided to dip skirt panels in indigo, using the same pattern as above. I found some unworn white tee shirts at the thrift store.  When I dipped them, I discovered that the indigo left beautiful lines on it, and I took that as my signal to embroider. I wanted to do 2 layers, so I bought some brown jersey for the underside. Two layers make a nice slightly heavier skirt. No reverse applique on this one, though...

My Grandmother's thimble in use on this project. I think she'd like that.
 

Stitching in progress...lines from the cosmic fate thanks to indigo dip, made manifest


Finished skirt!


As our tee shirts cover many miles over the world to reach us, I believe that creating items that we hold on to for long periods of time are important. 

Saturday, July 8, 2023

Labyrinth Knitting

 Last year, I took 2 classes at SAFF with Jolie Elder,  here is her blog.   One of her classes was "Liberating the Labyrinth." Knitting in a labyrinth was advanced by Debbie New in her book "Unexpected Knitting." I like knitting that doesn't bore me, and this qualifies!

If you look up "labyrinth" on Ravelry, it shows you knitting resulting in  patterns that look like labyrinths, not necessarily knit with this labyrinth techinique. So, while this technique needs a new name, I'm not the one to do it!

Here is a dishcloth or maybe it's a washcloth.  I'm not giving directions here, but if you might be able to figure it out!  Peaches an Creme from Walmart.


Here's another one, same yarn, same Walmart...


After these, I decided that I wanted to do some stash busting with some of my larger yarn stash, and decided to try a larger piece, with the goal of making a wooly afghan. Someday I will finish it!


Sunday, May 14, 2023

What People Wore: Mary Madison's "Plantation Slave Weavers Remember"

I love this book; Mary Madison extracted its contents and carefully culled from WPA records and the Library of Congress. 

Note: I apologize for the line height discrepancies, it appears that I must edit in html to fix this, not my strong suit!

I am fascinated with learned about what people used to wear. Enslaved peoples cultivated, harvested, prepared, spun, wove, and knit for both themselves and their owners. I am  specifically interested in what unfree and working people wore. Clothing and household linens were made "from scratch." The Key concept here is "might be" as this information is drawn from individual people's memories and practices certain varied. I'm not really giving the stories away here, the real heart of this book is being able to "listen" to the memories of these people in their own words. 

 I am also  reading an article, "The Material World of Cloth: Production and Use in Eighteenth Century Rural Pennsylvania" by Adrienne D. Hood, published in the Mary and William Quarterly and available by logging in at JSTOR. Among the many other fascinating things mentioned is  that different qualities of fabric were woven in the 1700's in Pennsylvania, and the highest qualities were often imported, such as fine linen from Ireland. 

What strikes me from Madison's book is the very high quality of fabrics that could be produced, in addition to coarser cloths that were undoubtedly faster to produce as shortcuts could be taken in production, less fine fiber spun, and fewer ends per inch woven.


So here are some of my notes, my thoughts are in italic. I've added a couple photos from my travels in North Carolina and Wikipedia.

Osnaburg 

"Draw's" (drawers) might be made made from osnaburg.  Doesn't sound particularly comfortable!

I had thought that osnaburg was imported from Europe owing to it's name from Osnabrück from which it was probably originally imported. However it is a coarse plain weave fabric that naturally was easily produced on this side of the Atlantic, to the extent that turning flax into linen or tow is easy. According to Wikipedia, it could be flax, hemp, or jute.  I recall reading  in Rinker Buck's "The Oregon Trail: A New American Journey" (also recommended) that Osnaburg covered those covered wagons. 


Knitting

Enslaved persons would knit "sox". Darning of socks of course was done.

Spinning 

Children spun cotton as soon as they were old enough to.  A corn shuck or husk would be used as a "broach" to hold spun thread. Ropes were of course also spun and created. wool and cotton lint might be combined then spun. Thread that was spun was noted to be as fine as today's sewing thread.  A shuck "broach" might be put on a spinning wheel spindle  to easily slide the spun thread off and as a way of storage. Both the hand turned great wheel and flyer lead wheels are mentioned. 

So, cotton grown on plantation was used to make their own clothing and not just for export to England.  Spinning cotton into a thread is hard and something that will take me a long time to master. I know from this reading that they might have been using a spinning wheel. Click reels might be used to measure out skeins of cotton as it was spun. Amounts were important to know as daily quotas were set. 

Coverlets

Coverlets were woven with thread dyed with a variety of  colors. Here's a photo of some  coverlet samples on display at the Southern Highland Craft Guild, that I took a couple of years ago.


Natural Dyes

Natural dyes including black walnut bark dye, indigo, red earth. Copperas was both a dye and a mordant; Salt combined with vinegar was also used as a mordant in the dye pot.  "All colors of the rainbow" could be achieved. Dyers along with all the craftspeople were highly skilled.

Weaving

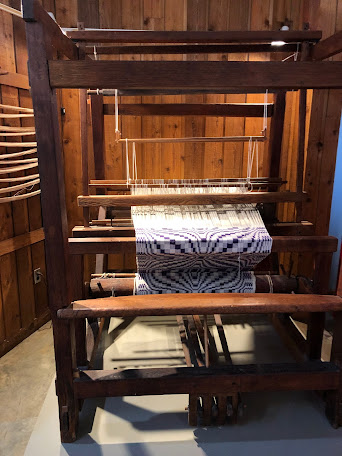
A child might kneel next to the loom and throw the "sheckle".    Weaving might occur in a designated room in the house so that it could be supervised by the mistress of the house, or in a separate weaving shed. 

Photo of a barn loom taken by me at the Southern Highland Craft Guild several years ago. 


Fabric 

A variety of fabrics with respect to fiber content were produced. One person describes a cloth with 3 strands cotton and 2 of wool. Double weave for winter clothing although sometimes wore cotton in winter or a wool mix.  "Jeans" was woven to make men's suits out of, presumable this would have been a twill.  "Gusta" was another type of coarse woven fabric.  I could not find any source for this name. "Nits and lice" coarse cloth for overalls that look like speckles

I'm fascinated with jeans (the garment) and their history. The term "jeans," according to this Wikipedia entry, says that the term "jeans" referring to  the fabric, may have been   derived from Genoa, where the particular  weave (a twill?) used in jeans-the-garment originated. The French word for Genoa is "Gêne," hence the term "jean."  

Clothing

A number speak of "good warm clothes" woven especially for winter, in one instance the interviewee speaks of  "plenty of clothes", another says that  given two complete outfits were given twice a year, one summer one winter. During the Civil War, white owners and families wore homespun (could not purchase ready made presumably). Enslaved people might weave fabric for poorer whites who could produce thread but not weave it.  Adrienne Hood notes that in comparison to households with looms, there were many many more households with spinning wheels, in 18th century Pennsylvania. 

Work

Fabric producers were sometimes made to work until late or all night

Cotton ginning and pressing

Cotton gins might have treadmills to walk in like stairs, but gins were also  turned by mule. The cotton was fed by hand which was quite dangerous. then treaded by hand to compress it or a bale press was used. It was also noted in the book that sometimes seeds were removed from cotton by hand.

There is an old bale press in Latta South Carolina. Here's a link with info https://en.wikipedia.org/wiki/Cotton_Press_%28Latta,_South_Carolina%29  and a photo courtesy of Wikipedia. 


Monday, April 24, 2023

My Tapestry Looms

 These looms, apparently, multiply the way spinning wheels do!

After seeing a friend's tapestries, I was enchanted. It was one of those epiphany moments when you know what your next creative step is will be.  One of the things the friend had was copper pipe looms. Having a touch of the steampunk in me, I wanted to own one!

I took Rebecca Mezoff's "Little Looms" class online. I recommend her classes. Learned the basics and a bit more, and figured out that I did not need to use classic tapestry wools but I could use my stash.None of my looms here have a shedding mechanism to make opening the shed faster, so it must be "picked". You CAN add heddles but I have not done that here.  I should note that there are many brands and styles of tapestry looms. You can also make your own from a sturdy picture frame!

Here is a weaving on a copper pipe loom:  she will be the orange goddess when I'm done. I purchased this loom (cheating!!)  because I could not wait to make my own... Copper pipe looms are tensionable, i.e., they can have a screw mechanism to loosen the weaving as you weave, because the weaving tightens up.  Here is Rebecca Mezoff's  blog post on making a pipe loom: https://rebeccamezoff.com/blog/2016/10/23/making-your-own-tapestry-loom-out-of-copper-pipe. You can either solder it or buy more expensive corners that will fit on your pipes.  If you take her "Little Looms" class you can learn how to solder one together (this one is soldered).


Here is a loom that I acquired for free from a Guild swap meet. I love it. The friend who I got it from thinks that SHE got it from a flea market.  I should give her a plug: here is Suzy's FB page for her fiber business:  https://www.facebook.com/SWHFiberWorks/. I found out later in a facebook group that this is an "Oola loom", not made anymore. It has a tension mechanism but I don't use it. The company that made it is now Cactus Flower Looms. They don't carry the same product anymore but have similar models here: https://cherry-creek-valley-farms.myshopify.com/collections/looms

I like this loom because I don't have to weave a header or a footer, I can just start at the bottom and weave all the way to the top.


Here is my homemade copper pipe loom. I cheated and rather than soldering I bought more expensive joints to fit my loom. Figuring out the size of threaded rod was tricky and required a trip to Home Depot in person. I did buy the little tool to cut copper rod, however!


If I were to buy another loom (this could happen) I may get a HelloHydrangea Loom with a shedding mechanism available  here:https://www.hellohydrangea.com/shop/looms.


Sunday, April 9, 2023

Tapestry Weaving...Views of cardboard weaving and some inspiration from Kate

Done on a cardboard loom

Here is a "loom" purchased from amazon.  You could make this yourself but the precut slots are convenient. 

Warped


Half hitch header


Meet and separate


Basic Hatching


Some inspiration:

Here  are some weavings done by my friend Kate, she is on instagram as #kates_cottage_weaves. These show how Kates uses the vertical aspect of her weaving to create the appearance of a landscape. These were NOT done on a cardboard loom but could have been! Kate uses square or rectangular frame loom without a heddle, so she is picking out each shed. As Kate points out even horizontal sections of her weavings can be viewed as mini-landscapes.  Kate uses embroidery and fabric strips for warp. She also uses visible warp as a design element. 


Here is a small purse that Kate created from a weaving

One thing that I like about tapestry is that I am constantly making creative decisions. I'm not following a pattern...this is part of my definition of art. 

Here's an in-process weaving on a cardboard loom. This one is going around the loom to make a small purse. 


Here's one done on a purchased copper pipe loom. I later made my own (without soldering, but using expensive attachable joints.  I love the "mountains beyond mountains" look. I have the landscape bug too.


 This was done on a frame loom given to me by a friend.  I chose to sew tabs on it and back it with fabric. This is called "Virgo Rising"


Saturday, February 25, 2023

Two (more!) Continuous Strand Square Loom Baby Jackets

 I have managed to finish two of these  jackets done on my 28 inch square loom in the last several months.  They don't take too long to weave, they are then felted in the washer and sewn. Then I add a crocheted cuffs and a hood.  They all come out about the same size but no matter. They are sent to Lifting Hand International for refugee relief, link here to the Ravelry group Hats and More for Refugees Worldwide.  Here is a link to  the original instructions:

 http://spinsjal.blogspot.com/search/label/Square%20Loom%20Weaving


Here is a before photo for this one